	<--

	 -- Sorry for my home page being such a mess, but I didn't

	 -- find the time to implement the "relaunch", yet.

	 -- Anyway, hope you enjoy this:

	 -->
Translucency with Delphi 5 or newer
posted 01-29-2002, updated
Develop great applications using free-form forms with anti-aliasing and translucency
1. Overview
- Overview
- Intro
- Motivation - Why this small tutorial?
- What you should already Know
- Getting Started
- Dive Into
- On The Way
- Doing Artwork
- Almost done - Done!
- Outro
2. Intro
Hi there! First of all I like to introduce myself: I am Christian Blichmann, a 20 year-old computer
sciences student from germany, registered my account with delphi3000.com not long ago.
I am programming in Delphi for about four years now and would describe my skills as an
intermediate hobbiest. Ok, 'nuff said:
3. Motivation - Why this small tutorial?
Yesterday, I was downloading and installing Winamp 3 beta 2.5 from the Nullsoft web site, and
among other things, I also downloaded a bunch of skins.
While trying these, I wondered, how the makers of this nifty little skin engine added support for
free-formed shapes. Even translucency (that's why we're here) is supported!
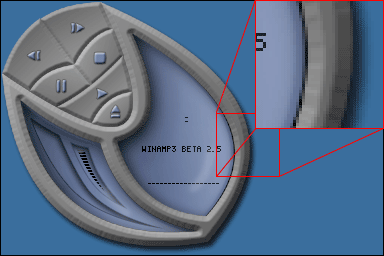 This is how some of the skins used by Winamp look alike.
Notice: you can even drag these skinnable window and - similiar to the pointer-shadow feature
of Windows 2000 - the shadow smoothly slides over the screen and anything displayed beneath it.
Stunning, staring at my screen in utter disbelief ;-), I wanted to create a thing like this my own, using a programming
language that a hobbiest like me can understand (C/C++ is IMHO very cryptical).
4. What you should already Know
That's always the problem with a tutorial: You simply cannot depend on the readers knowledge,
so I will try my best to make the explanations not too hard to understand, but there are
definitely some thing you should know when using this guide:
- The Pascal programming language, or better the Borland-variant Object Pascal
- How to use the Delphi IDE, especially the Object Inspector, Form Designer and Code
Editor, as well as maintaining and installing packages and components
- Experience with at least one of the following image editing programs: Adobe Photoshop,
The GIMP or PaintShop Pro. I will be using Adobe Photoshop 6, though
- Some knowledge of the Microsoft Win32 API is helpful, but not required.
Oh, I almost forgot: This will only work with Windows 2000/XP....
5. Getting Started
I suppose, you now want to see what I've created so far:
Download Executable (277 KB), or take a look for yourselves:
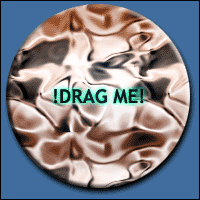 In this tutorial, we will create an app like this.
Other things you need to build the example app:
- The source distribution (318 KB) of my code.
Includes executables with run-time packages.
Note: This is freeware and comes "AS IS" (well as all the other things on this page that
are my work). It's also *not* commented, I will explain the source on this page.
- In my example, I'm using Graphics32 by Alex Denissov, "a freeware set of Delphi classes
and components optimized for fast 32-bit graphics" for loading and manipulating 32bit
bitmaps. I used v0.99d, but it should work with version 1.0 as well.
- A reasonably modern image editing tool such as Adobe Photoshop.
Get a tryout from http://www.adobe.com/products/photoshop/tryreg.html (~41 MB).
You may also want to evaluate The GIMP, or PaintShop Pro.
I was using Adobe Photoshop 6 tryout to illustrate how it works, and The GIMP to do the actual saving, since you cannot save with the tryout...
- And, of course, the Pascal-compiler: Borland Delphi 5.0 or higher (only tested there),
standard edition should be sufficient, may work on other versions as well (particularly on
Delphi 6.0, it has built-in support for some of the functions we will use). WON'T WORK WITH KYLIX!
If you don't already own it, go grab a trial version from Borland.
6. Dive Into
When you have everything downloaded and installed in place, we can actually take a look how I created
the sample (I will give step by step instructions, so you can create the application while
reading):
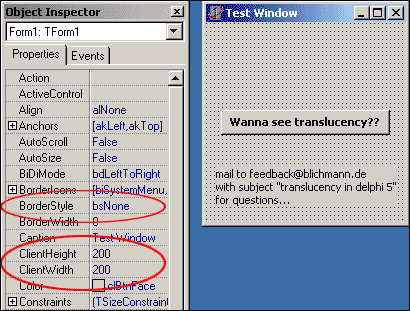
First of all, create a new project with a new form in Delphi 5.0 like this (Using File|New Application):
Note the ellipse around the BorderStyle, ClientWidth and ClientHeight properties. Set them to
bsNone / 200 pixels, respectively (our graphics will be that large).
Second, add a TButton and optionally a TLabel onto the form, we will use the button later to
activate the translucency.
Now, switch over to the editor, you will see some code like this:
unit Unit2;

interface

uses
  Windows, Messages, SysUtils, Classes, Graphics, Controls, Forms, Dialogs;

type
  TForm1 = class(TForm)
  private
    { Private declarations }
  public
    { Public declarations }
  end;

var
  Form1: TForm1;

implementation

{$R *.DFM}

end.
To support the things we now want do do, we have to define some constants and
declare some functions, that were obviously forgotten by Borland (they are
included in Delphi 6, so you should be able to skip this step on that IDE):
{ ... }
implementation

{$R *.DFM}

{ Insert here }

const
  WS_EX_LAYERED = $80000;

  AC_SRC_OVER = $0;
  AC_SRC_ALPHA = $1;
  AC_SRC_NO_PREMULT_ALPHA = $1;
  AC_SRC_NO_ALPHA = $2;
  AC_DST_NO_PREMULT_ALPHA = $10;
  AC_DST_NO_ALPHA = $20;

  LWA_COLORKEY = $1;
  LWA_ALPHA = $2;

  ULW_COLORKEY = $1;
  ULW_ALPHA =$2;
  ULW_OPAQUE = $4;


function SetLayeredWindowAttributes(hwnd: HWND; crKey: TColor; bAlpha: byte;
  dwFlags: DWORD): BOOL; stdcall; external 'user32.dll';

function UpdateLayeredWindow(hwnd: HWND; hdcDst: HDC; pptDst: PPoint;
  psize: PSize; hdcSrc: HDC; pptSrc: PPoint; crKey: TColor;
  pblend: PBlendFunction; dwFlags: DWORD): BOOL; stdcall; external 'user32.dll';

{ Insert End }

{ ... }
Ok, let's have a look on those functions (I will explain the parameters later on):
SetLayeredWindowAttributes: This function activates a Windows 2000/XP-feature
called Layered Windows, which allows you to set the opacity and transparency color key
of a window.
UpdateLayeredWindow: This function updates the position, size, shape, content, and
translucency of a layered window. The more sophisticated of the two, and more memory
efficient ;-)
But wait! How do I create a "Layered Window"? - Well that's quite easy done: Just call
SetWindowLong, passing the current form's
Handle property and the
GWL_EX_STYLE constant
as the first and second parameters. This indicates that you want to change the form's extended
window style. The third parameter should be
WS_EX_LAYERED, which actually makes the window a "layered" one.
You may wonder that if we update the extended window-style, the other (possible) extended
styles are gone - don't worry,
SetWindowLong is cumulative, it just adds the right bits to the existing
extended style.
Now comes the alpha-blending stuff, insert the following into the
OnClick-handler of the
button:
{ ... }

procedure TForm1.Button1Click(Sender: TObject);
begin
  { Insert here }
  Button1.Enabled := False;

  if SetWindowLong(Handle, GWL_EXSTYLE, WS_EX_LAYERED) <> 0 then
    SetLayeredWindowAttributes(Handle, clNone, 128, LWA_ALPHA);
  { Insert end }
end;

{ ... }
For maximum effect, you have to move the window by clicking and dragging anywhere
in the form, but by now you can't move it at all. To allow for window dragging,
add the following message handler to the form:
    { ... }
    procedure Button1Click(Sender: TObject);
  private
    { Insert here }
    procedure WMNCHitTest(var Message: TWMNCHitTest); message WM_NCHITTEST;
    { Insert end }
  public
  end;
  { ... }

implementation

{ ... }

procedure TForm1.WMNCHitTest(var Message: TWMNCHitTest);
begin
  Message.Result := HTCaption;
end;

{ ... }
This will fool Windows into thinking that every part of your form is
a window caption. Since window captions usually move a window, our window is now
movable.
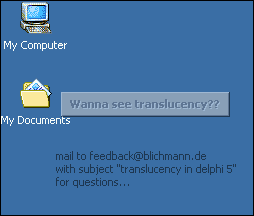
If you compile and run our app, it will look similiar to this:
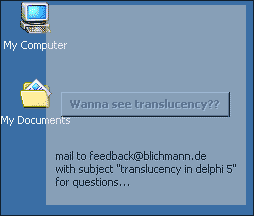
Pretty cool (but you might know this from Delphi 6, it has some properties of TForm, with which
you can also do things like that)!
Explanation: We called SetWindowLong and supplied the window-handle of
our form (the hwnd parameter from the declaration). The second
parameter is used for the color key only, which allows you to make those parts of your form
that are of this color transparent (i.e. you may click through!) - see below for details.
Now take a look at the third and fourth parameters, namely
bAlpha and dwFlags. bAlpha is the opacity value, ranged 0
(fully transparent) to 255 (opaque). I've chosen 128 (equals to 50% blending) for the purposes
of this example. The dwFlags parameter tells windows, what you want to do:
In this case, we wanted the whole window to be partially transparent, so we use the
LWA_ALPHA flag. That's it already, you can now play around (or even animate
the blending using a TTimer's OnClick event...) with
the parameters.
A few words to the crKey: If you change the Color property
of your form to clRed, you can try this:
{ ... }

if SetWindowLong(Handle, GWL_EXSTYLE, WS_EX_LAYERED) <> 0 then
  SetLayeredWindowAttributes(Handle, clRed, 128, LWA_ALPHA or LWA_COLORKEY);

{ ... }
This will make everything of the form that is colored with clRed (or any other color
you hav chosen for both the Color property and the crKey parameter)
transparent, and the rest is blended with 50% opacity. This also gives you a hint at my
Button1.Enabled := false-code, since otherwise you won't be able to move the window at
all (this is because Button1 receives and processes the mouse click *before* the
window, hence you can't move it anymore).
7. On The Way
By using SetLayeredWindowAttributes, you reach the border line quite easily.
You might say now:
"But you promised a lot more than a simple alpha-blending, I could've done that myself".
This is because
- it was meant as an introduction to the topic.
- it belongs to Windows' "Layered Windows" feature, that I also wanted to explain.
- you're impatient and don't want to read all this to the end.
The key to true translucency and free-form shapes lies in the
UpdateLayeredWindow function.
Using this function you can achieve the same effects as in the previous sections (this is what we will
do first), but it is more complicated to initialize.
Ok, let's begin using it - delete or uncomment the code you have entered for
Button1's
OnClick handler, and insert the following
code:
{ ... }

procedure TForm1.Button1Click(Sender: TObject);
{ Insert here }
var
  DC: HDC;
  BmpTopLeft, TopLeft: TPoint;
  Blend: TBlendFunction;
  BmpSize: TSize;
  WorkBmp: TBitmap;
{ Insert end }
begin
  { Insert here }
  Button1.Enabled := False;

  {*1*}
  if SetWindowLong(Handle, GWL_EXSTYLE, WS_EX_LAYERED) = 0 then
    Exit;

  // This is to avoid compiler the warning:
  // Variable 'WorkBmp' might not have been initialized
  WorkBmp := nil;

  try
    {*2*}
    WorkBmp := TBitmap.Create;
    with WorkBmp, Canvas, BmpSize do
    begin
      cx := ClientWidth;
      cy := ClientHeight;

      PixelFormat := pf32Bit;
      Width :=  cx;
      Height := cy;

      CopyRect(Bounds(0, 0, cx, cy), GetFormImage.Canvas, Bounds(0, 0, cx, cy));
    end;

    TopLeft := BoundsRect.TopLeft;
    BmpTopLeft := Point(0, 0);

    {*3*}
    DC := GetDC(0);
    if not Win32Check(LongBool(DC)) then
      RaiseLastWin32Error;

    {*4*}
    with Blend do
    begin
      BlendOp :=             AC_SRC_OVER;
      BlendFlags :=          0;
      SourceConstantAlpha := 128;
      AlphaFormat :=         0;
    end;

    {*5*}
    if not Win32Check(UpdateLayeredWindow(Handle, DC, @TopLeft, @BmpSize,
      WorkBmp.Canvas.Handle, @BmpTopLeft, clNone, @Blend, ULW_ALPHA)) then
      RaiseLastWin32Error;
  finally
    WorkBmp.Free;
  end;
  { Insert end }
end;

{ ... }
I think you agree that this would not have been a good start for a
tutorial...
Most of the stuff above, however, is about initializing and filling the necessary
structures and to set up an in-memory bitmap, so the code is pretty straight forward:
{*1*} First of all, we set this WS_EX_LAYERED style-bit from the previous section, and
we only continue if the bit was set successfully.
{*2*} Secondly, we initialize an TBitmap to hold an image of our form,
and set its Width and Height through the member values
of BmpSize, which is used to indicate how large the part of the form
that will be blended is. Next, we copy the contents of the whole form into our newly
created bitmap using TCanvas.CopyRect and TForm.GetFormImage.
Then TopLeft becomes a copy of our form's top-left corner coordinates
and BmpTopLeft is set to (0, 0), since we want the whole form image
to be blended.
{*3*} At next, DC is assigned a display context of the
entire screen by passing 0 as the hWnd parameter of GetDC. If we
fail to retrieve that DC, we raise an exception saying so and abort this routine.
{*4*} We are now finally about to set up the blending options (the pBlend parameter)!
Most parts of this record are initialized to their default values: BlendOp currently ony
supports AC_SRC_OVER and BlendFlags is currently reserved (0).
That leaves SourceConstantAlpha and AlphaFormat: The first has the same meaning as
bAlpha from SetLayeredWindowAttributes, while the latter controls whether we use
per-pixel alpha-blending or a constant opacity throughout the window (for that reason we later use AlphaFormat
with value AC_SRC_ALPHA).
{*5*} Almost finished: here we finally call UpdateLayeredWindow, passing
the form's Handle, the screen surface (DC), the area to use (TopLeft and
BmpSize, both measured relative to the top-left corner of DC), the source coordinates
along with the color-key (BmpTopLeft, clNone) and the blend function to use (Blend).
With ULW_ALPHA, we indicate that we want to use the blend function. You may also or this with
ULW_COLORKEY to make everything colored in crKeys transparent.
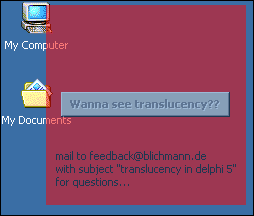
If everything went right during compilation, you will see something like this (after
clicking the button of course):
8. Doing Artwork
Ok, minimize Delphi for a while, and open Photoshop or your favorite image editing tool.
To achieve the desired effect, we have to create two bitmaps:
- The image that you want to display (i.e. the skin background)
- An image-mask, a (mostly) gray bitmap that will serve the per-pixel alpha values
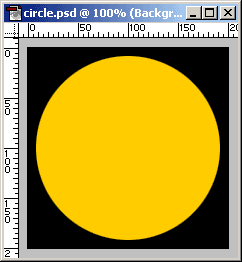
Let begin with the skin background (in this example I will create a small, filled
circle with a "drop shadow"). Our window in the previous sections was
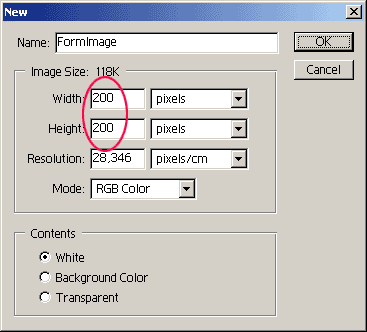
200x200 pixels wide, so we should start by creating an image that big (use a "White"
background):
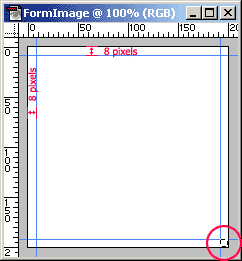
Next, create four new guides 8 pixels from the border of the image. To do this,
first create a small selection (anywhere in the image) that is 8 pixels tall and wide
(you can use the Info tool window to view the current selection size). If this is
tricky (mostly because of bad eyes and/or a screen resolution that is to large (24"
Monitor...) ;-), try zooming in to about 400%.
Then, drag your selection to the upper-left
corner (assuming you have "View | Snap To | All" activated). You can now create the
guides by dragging them from the ruler down to the lower edge of your selection.
Repeat this procedure until you have all four guides created:
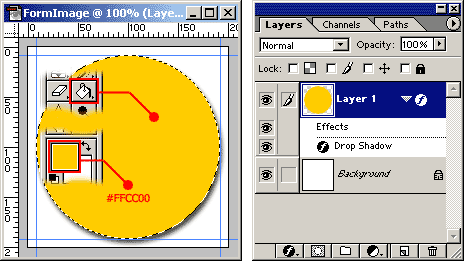
Create a new layer either by using "Layer | New | Layer" or by pressing <Ctrl>+<Shift>+N.
Then, using the "Elliptical Marquee Tool", draw a perfectly round selection from the
upper-left to the lower-right, and fill it with #FFCC00 (peach orange if we were under X11).
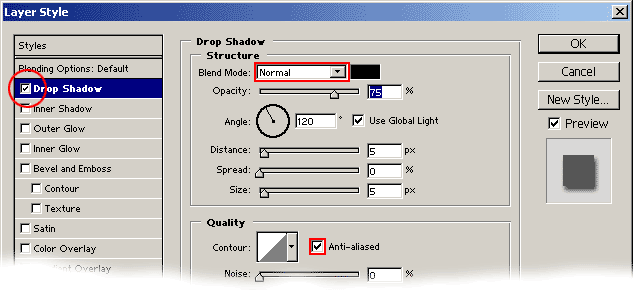
In the "Layers" tab, double-click on your newly created "Layer 1", to add a "drop shadow":
By double-clicking you should've opened the "Layer Style" dialog and select the options
marked in red (set all other settings to their defaults):
If you applied the settings in "Layer Style", we are done for the first image.
Save it with "File | Save" to make a Photoshop-backup for later use, but don't close it, yet.
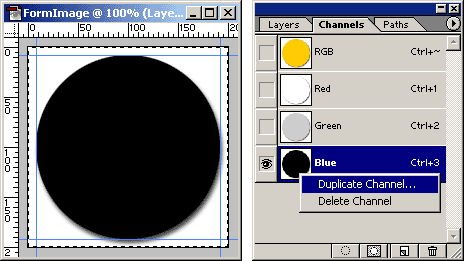
The image-mask: In the "Channels" tab, right-click "Blue" (for this example this works,
with other graphics it might not) and select "Duplicate" - Photoshop will display a
blue-only view then:
In the "Duplicate Channel" dialog, select "New" from the "Document" combobox.
Name it "circle_alpha" and select "Invert", then click "OK".
Don't close the original "circle", yet.
Change the color depth of your image-mask to 8 bit by using "Image | Mode |
Grayscale" and export the new file to "circle_alpha.bmp" using "File | Save As..." and
by specifying the "BMP" format.
By the way, save the file to the folder where you have created your delphi project, or better:
where the executable will be placed.
Select "Windows" and "24 bit" in the upcomming dialog.
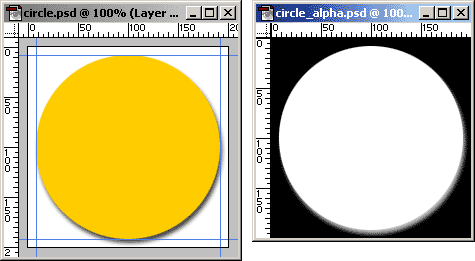
The work area should look like this now:
Just a few step remain: Click the "Background" layer of you original circle,
and fill it with black (#000000):
Export your circle using "File | Save as..." again, but this time select "As a copy" and,
again, the "BMP" format. Choose "circle.bmp" as the filename and select "Windows" and "24 bit"
in the upcomming dialog.
That's it, you've successfully created the skin background and its alpha channel.
I know that this is by far not the optimum of doing this in Photoshop, and that
we waste space by saving both bitmaps with 24 bits per pixel, *but*: This is just
a basic tutorial of how things like this work. In the next section we will waste
even more space, but for the purposes of example, this is just fine. You can
tune your app later.
9. Almost Done - Done!
Did I lose you? - I hope not, because now it gets interesting - we're on the final
steps:
Switch back to Delphi (close Photoshop if you want, we won't need it here) and
change the source code to look like this:
unit Form1;

{ ... }

implementation

{ Insert here }
uses
  {*A*}
  G32, G32_Filters; // This includes parts of the Graphics32 Library
{ Insert end }

{$R *.DFM}

{ ... }

procedure TForm1.Button1Click(Sender: TObject);
var
  { Insert here }
  {*B*}
  AlphaBmp, SkinBmp: TBitmap32;
  { Insert end }
  DC: HDC;
  BmpTopLeft, TopLeft: TPoint;
  Blend: TBlendFunction;
  BmpSize: TSize;
  WorkBmp: TBitmap;
begin
  Button1.Enabled := False;

  {*1*}
  if SetWindowLong(Handle, GWL_EXSTYLE, WS_EX_LAYERED) = 0 then
    Exit;

  // This is to avoid compiler the warning:
  // Variable 'WorkBmp' might not have been initialized
  WorkBmp := nil;
  { Insert here }
  AlphaBmp := nil;
  SkinBmp := nil;
  { Insert end }

  try
    {*2*}
    WorkBmp := TBitmap.Create;
    with WorkBmp, Canvas, BmpSize do
    begin
      cx := ClientWidth;
      cy := ClientHeight;

      PixelFormat := pf32Bit;
      Width :=  cx;
      Height := cy;

      { Comment this out, or delete: }
      //CopyRect(Bounds(0, 0, cx, cy), GetFormImage.Canvas, Bounds(0, 0, cx, cy));
      { Comment this out end }
    end;

    { Insert here }
    {*C*}
    AlphaBmp := TBitmap32.Create;
    AlphaBmp.LoadFromFile('circle_alpha.bmp');

    SkinBmp := TBitmap32.Create;
    with SkinBmp do
    begin
      LoadFromFile('circle.bmp');
	  {*D*}
      IntensityToAlpha(SkinBmp, AlphaBmp);

      DrawTo(WorkBmp.Canvas.Handle, 0, 0);
    end;

    { Insert end }
    TopLeft := BoundsRect.TopLeft;
    BmpTopLeft := Point(0, 0);

    {*3*}
    DC := GetDC(0);
    if not Win32Check(LongBool(DC)) then
      RaiseLastWin32Error;

    {*4*}
    with Blend do
    begin
      BlendOp :=             AC_SRC_OVER;
      BlendFlags :=          0;
      { Change here }
	  {*E*}
      SourceConstantAlpha := {*}255{*};
      AlphaFormat :=         {*}AC_SRC_ALPHA{*};
      { Change end }
    end;

    {*5*}
    if not Win32Check(UpdateLayeredWindow(Handle, DC, @TopLeft, @BmpSize,
      WorkBmp.Canvas.Handle, @BmpTopLeft, clNone, @Blend, ULW_ALPHA)) then
      RaiseLastWin32Error;
  finally
    WorkBmp.Free;
    { Insert here }
    AlphaBmp.Free;
    SkinBmp.Free;
    { Insert end }
  end;
end;

{ ... }
This is, what the changes do:
In {*A*}, we simply include the Graphics32 library (just in
case you wondered, why I requested you to download it at the beginning...).
{*B*}: We need two more bitmaps, one for loading the
skin background (SkinBmp) and one as an alpha image-mask (AlphaBmp).
The Bitmap32 is the core component of the Graphics32 library. It
has a lots of other cool stuff included: Anti-aliased lines with/without clipping,
alpha-blending (but this time not intended for real-time UI-windows) and much
more, I could almost write a book about it. And of course :-), everything works
with MMX...
Enough advertising, in {*C*}, we load our image-mask and
the skin background, just as we would do with a standard TBitmap.
{*D*}, however, is crucial to the functionality we want to
provide: IntensityToAlpha takes every single pixel of our image-mask
and recombines it with our SkinBmp, so that the alpha value of a
pixel in SkinBmp corresponds to the color intensity of a pixel in
AlphaBmp. Once more: white pixels that equal to a value of 255 (in an
8 bit grayscale image) in the image-mask correspond to an alpha value of 255 (opaque),
while black image-mask pixels result in an alpha value of 0 (fully transparent).
This even works with colored image-masks, because it
calculates a weighted color intensity using the same method that is used in
your graphics adapter's BIOS.
To activate per-pixel alpha blending, we have to change the value of SourceConstantAlpha
to 255 (opaque), and change the value of AlphaFormat
to AC_SRC_ALPHA.
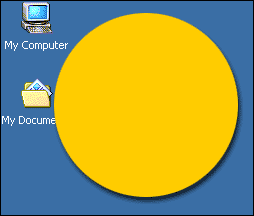
To test our new per-pixel alpha, simply compile and run it with Delphi.
If everything went ok, the program now has a smoothed, anti-aliased edge with
a "drop shadow"!
10. Outro
Congratulations! You have succesfully build an application with a window
that is draggable, has smooth, anti-aliased edges, and that "drops" a shadow
on your screen.
this does not run on Windows 98/ME and it is intended for use with Windows 2000
and Windows XP, only.
I hope you had as much fun reading and trying as I had writing this tutorial.
If you create something useful with it, let me know. Depending on the feedback
I get, I will eventually create some VCL-components for use with your applications.
Have fun!
Christian Blichmann
PS: The source distribution accompanying my tutorial include built executables
and some more samples...
Don't hesitate - email me with your thoughts:
feedback@blichmann.de
 home
home sitemap
 my blichmann.de
 about
about downloads
 links
links forum
forum guestbook
 login
login


